本教程將教您如何設置 Thunderbird 與您的託管電子郵件帳戶一起使用。我們將使用測試電子郵件帳戶 support@zbtest.tube,它托管在我們的 s0101.gopls.com 上,來展示操作步驟。
在繼續進行 Thunderbird 設置之前,您需要確認您擁有正確的伺服器名稱,並且已經創建了一個郵箱。要找到這些資訊,請檢查以下文章: 我的帳戶托管在哪個伺服器上?
在本教程中,我們將使用測試電子郵件帳戶 support@zbtest.tube。要自動設置電子郵件帳戶,您需要執行以下步驟:
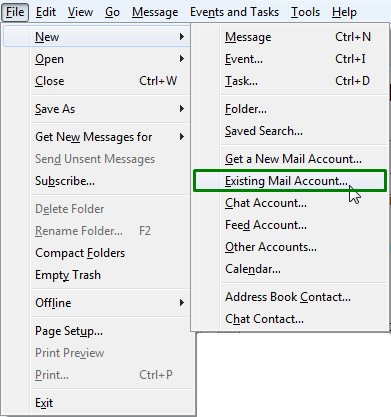
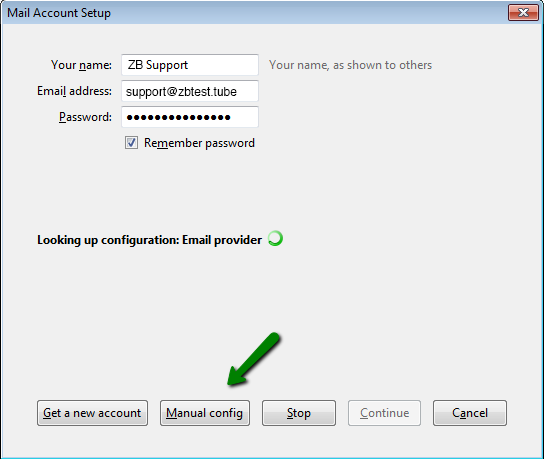
1. 前往 檔案 > 新增 > 現有郵件帳戶:
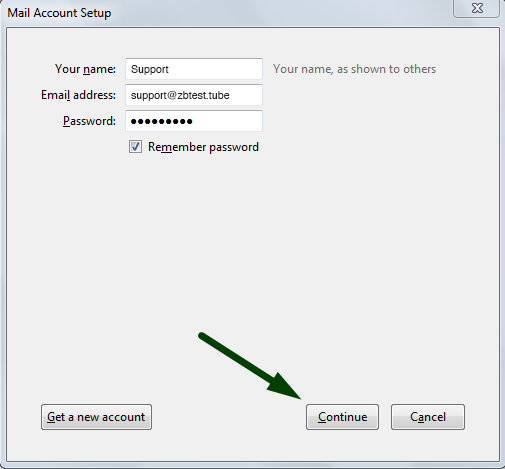
2. 在 郵件帳戶設置 窗口中輸入以下詳細資訊:
您的姓名: 您希望收件人看到的名稱
電子郵件地址: 您的完整電子郵件地址
密碼: 您的郵件帳戶密碼。
確保不包含空格。
3. 當所有欄位填寫完成後,點擊 繼續:
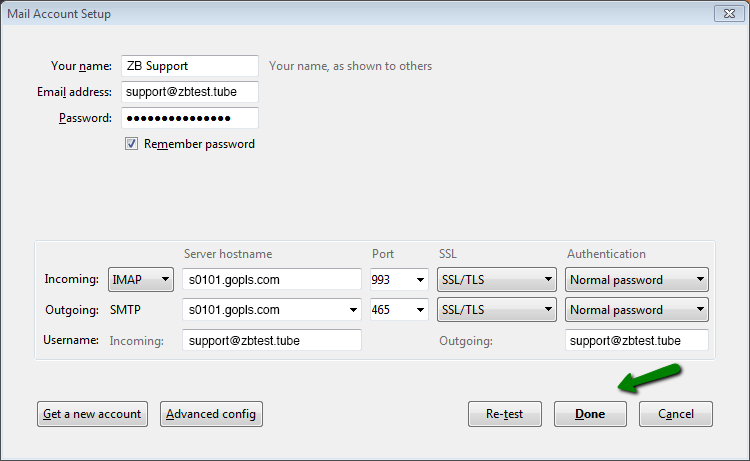
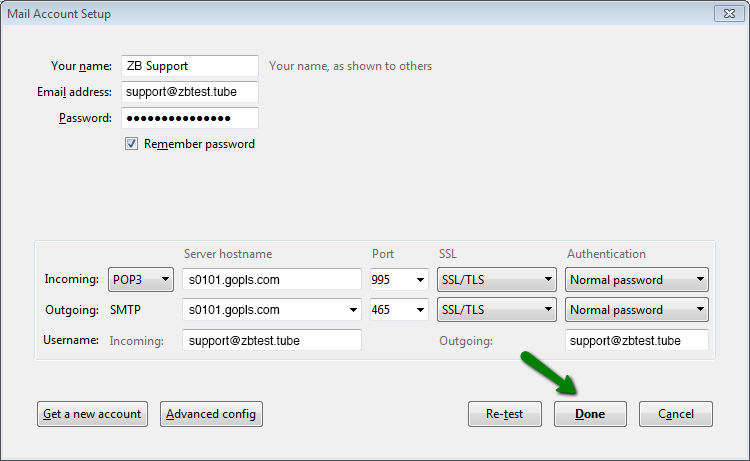
4. 您將看到 在電子郵件提供商處找到了配置 的訊息。
確保您的進入和發出配置已正確檢測,並與您在以下截圖中看到的相符:
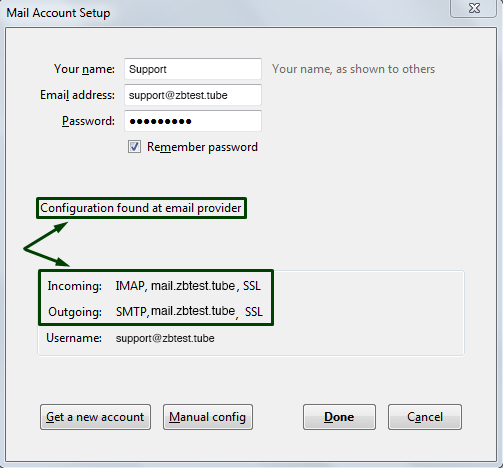
如果相同,請點擊 完成。
如果您未看到 在電子郵件提供商處找到了配置 訊息,或者因某種原因無法正確檢測配置,您可以完成前兩個步驟並以以下方式手動繼續配置 Thunderbird 手動:
1. 在完成前兩個步驟後,您將可以看到手動配置窗口(如果 Thunderbird 無法自動檢測配置),或者需要點擊 手動配置 來查看該窗口:
2. 在下一個屏幕中,從帳戶類型列表中選擇 POP3 或 IMAP,並根據以下設置輸入您的詳細資訊:
對於 IMAP 協議,使用以下設置:
進入(IMAP)和發出伺服器(SMTP):您的帳戶所託管的伺服器
協議: IMAP 端口: 993 SSL: SSL/TLS 驗證: 正常密碼
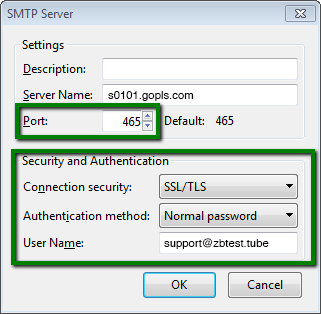
協議: SMTP 端口: 465 SSL: SSL/TLS 驗證: 正常密碼
對於 POP:
進入(POP)和發出伺服器(SMTP): 您的帳戶所託管的伺服器
協議: POP 端口: 995 SSL: SSL/TLS 驗證: 正常密碼
協議: SMTP 端口: 465 SSL: SSL/TLS 驗證: 正常密碼
或者,您可以使用以下設置:
IMAP:
協議: IMAP 端口: 143 SSL: 無(或 STARTTLS) 驗證: 正常密碼
協議: SMTP 端口: 25(或 587) SSL: 無(或 STARTTLS) 驗證: 正常密碼
POP:
協議: POP 端口: 110 SSL: 無(或 STARTTLS) 驗證: 正常密碼
協議: SMTP 端口: 25(或 587) SSL: 無(或 STARTTLS) 驗證: 正常密碼
注意:如果您使用 mail.domain.tld 作為伺服器名稱,可能會出現添加安全例外窗口。這是因為 exim、dovecot、ftp、cPanel 和其他服務的 SSL 是安裝到伺服器名稱上,並且會出現對 mail.domain.tld 的警告。請點擊確認安全例外按鈕以繼續。
為了避免這種情況,請使用您的伺服器名稱作為進入/發出伺服器:s0101.gopls.com
進階設置:
一旦您的帳戶創建完成,您將能夠選擇 IMAP 或 POP3 進入/發出伺服器的其他設置。
1. 在帳戶列表中右鍵單擊您的帳戶:
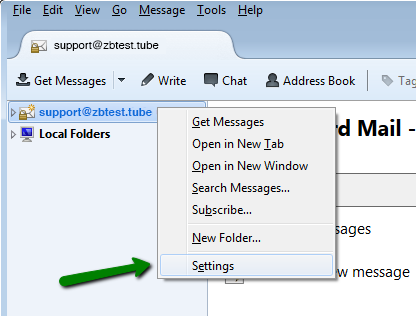
2. 要管理進入伺服器,請轉到 伺服器設置: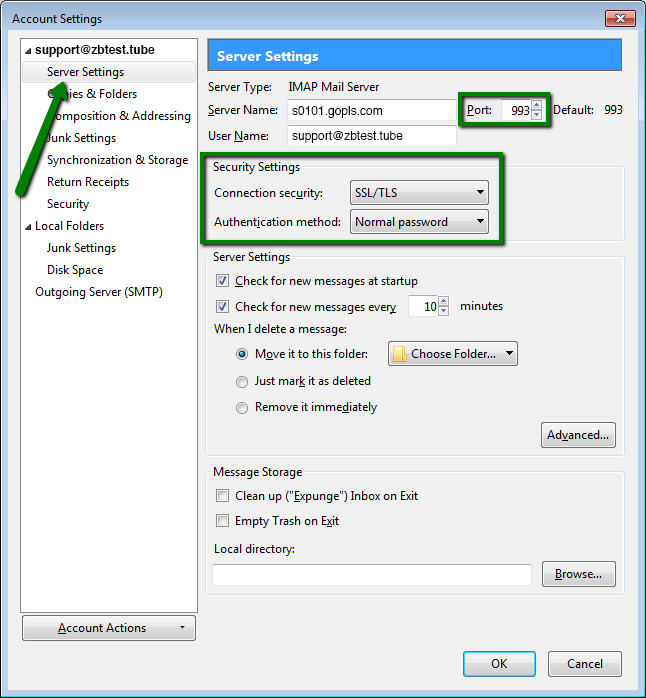
3. 如果您需要更改發出伺服器的設置,請選擇 發出伺服器(SMTP):
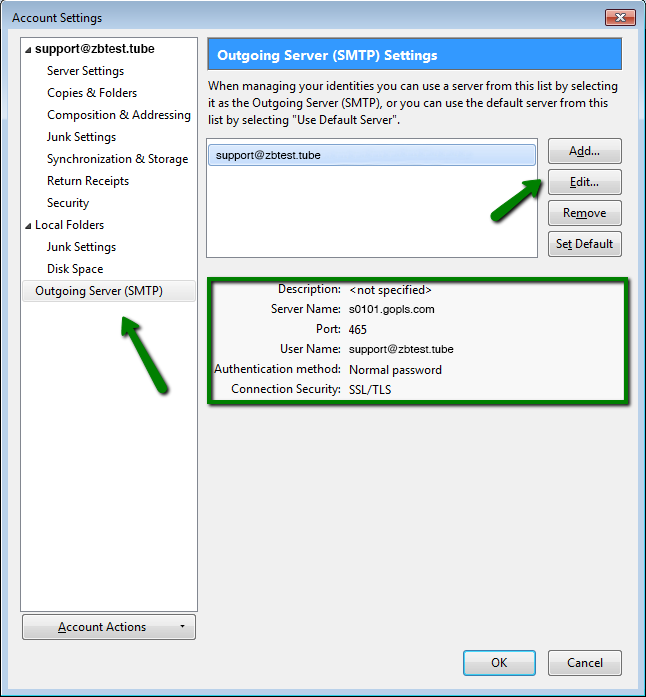
在這裡,您可以找到您擁有的帳戶的當前設置,並點擊 編輯... 在下一個窗口中進行更改: